I don't make baby quilts very often. I've made the following:
-Sometime in the 90s- a primary color quilt with animals, given to my sister T when she had her daughter.
-Sometime in the 00s- A couple of box-quilts made from funky fabrics. 2 themes: yellow (for my friend AEM) and blue and green plus frogs (for my friend ABS). Both had boys. I told them that one quilt was a lifetime supply. AEM is pregnant now with her second, a girl. (I sent her a squirrel book for the kids this time.)
-Sometime in the 00s- I got inspired to make a butterfly quilt, then gave it to my friend C who was expecting a girl.
In the last few years, I've made another from grey, black, white, and orange t-shirts. It is really cozy. I've waited to give to someone who is an alumni of my old high school (which had the colors orange and black for its teams) but no opportunity has presented. So, it is in the closet.
Recently, my mom made a flannel quilt for my cousin's new baby boy, which was blue with cowboys on it. I thought it was really cool. So when I found out my friend M was expecting, I wanted to make the same kind of quilt.
I chose monkeys and bananas as a theme because M likes bananas, and because I wanted something that wouldn't look either girlish or boyish. Besides, who doesn't love monkeys?
It's a cool concept in that the quilt has a smooth side and a fuzzy side. This will be explained better as we go along.
The project requires:
-3/4 yard of 4 different fabrics (flannel) (Or, 3 yards of flannels in whatever quantities you prefer)
-1/2 yard of same or coordinating fabric (flannel)
-patience
-time
-a sewing machine
-definitely some scissors or one of those pizza-slicer-style fabric cutters
Step 1: Cut all of the fabric (except for the 1/2 yard) into 6-inch squares.
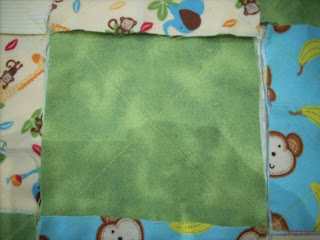
Step 2: Sew the squares together so that the outside of the fabric faces both ways. In other words, take 2 6-inch pieces with the pretty sides out and sew them together in an X formation. See the picture for additional information.
Step 3: Put all the squares together into different patterns so you can choose how you want your blanket to look. Keep in mind that you can buy different quantities of different fabrics to come up with a certain look.
For this project, I decided that if we did rows like stair-steps, it would look nice. This is what my layout looked like when the individual rows were sewn together but the entire interior of the quilt was not.
Step 4: Sew the squares together so that all of the seams are on one side. In other words, you have one side of a strip of flannel that is smooth, and the other side has the jagged edges of flannel. Use at least a 3/4 inch seam for these rows. You can see some examples of the jagged sides of the flannel on the second picture here.
This is where we end the home economics class for today. When we go to my mom's house, we will learn how to make the binding and sew it on to the outside of the blanket. I've chosen a lovely bright yellow for the binding.
-GALA
Grant Writing: Progress So Far
2 days ago


No comments:
Post a Comment